Often times when it comes to monitoring usage and uptime of PeopleSoft Weblogic Web Server, the approach seems very basic and straight forward for most PSADMINs - "grep for java". When you are involved in multiple stress/load testing initiatives, it pretty much becomes obvious that "grepping for java" is not enough to ascertain real-time status of your web server domain. In a stress/loading testing situation, your java heap is constantly drained of memory which is directly equivalent to the number load on your web server. After several failed attempts to get a true picture of my web server domain, I had to dig deeper for a viable solution and found out about Weblogic Scripting Tool called WLST. Though not a PeopleSoft certified tool, WLST has long been used by BEA Weblogic Developers since the release of Weblogic 8.1.
WLST - What is it ?
The WebLogic Scripting Tool is a BEA tool for scripting the configuration of BEA WebLogic domains. WLST is available as a developer release for WebLogic 8.1 on the BEA dev2dev web site. BEA includes WLST as part of WebLogic Server 9.x. WLST uses a powerful scripting language called Jython (a mix of Python and Java programming languages). WLST is available in two flavors:
• WSLT Online: can be used to query and modify a running WebLogic Server domain.
• WLST Offline: can be used to build WebLogic domains without requiring a running WebLogic Server domain.
How it Works
Weblogic Server includes a large number of MBeans (Managed Beans) which provides information about the runtime state of its resources. To access runtime information, you need to invoke WLST and connect to the running administrative server. The Weblogic Scripting Tool (WLST) is a command line scripting interface for Weblogic Server. The WLST scripting environment is based on Java scripting interpreter called Jython. Commands can be interpreted interactively from a command prompt or in batches supplied in a file (script).
Steps For Using WLST in PeopleSoft Weblogic Server
1. Download jython.jar and wlst.jar from www.jython.org/download.html
2. Add the following jar files to the Weblogic CLASSPATH environment variable – weblogic.jar, jython.jar, wlst.jar
3. Name script with .py extension. This is really important otherwise, you get an error when you run the script.
4. To invoke WLST; at the command prompt enter the following command – java weblogic.WLST
Below is an example of a script I wrote to monitor JVM usage, web server status and sessions. The script is pretty basic but you can incorporate logic if you want a more robust monitoring.
####################################################################
# This script monitors web server status, JVM usage, and Active Session Count
# Usage - java weblogic.WLST $SCRIPTNAME
# Note - Make sure the following is set on your $CLASSPATH before running
# script - wlst.jar,jython.jar,weblogic.jar
#
# Author - Troy Akitoye
# Date - Today
######################################################################
# Redirect stdout to a logfile #
redirect('/apps/ps/webserv/peoplesoft/Monitoring.log')
# User details to connect to the weblogic admin server #
username = 'system'
password = 'password'
url = 't3://mdsua0rq:7001'
connect(username,password,url)
runtime()
cd("/ServerRuntimes/""/PIA")
ServerName = cmo.getAdminServerHost()
ListenAddress = cmo.getSSLListenAddress()
ServerState = cmo.getState()
cd("/ServerRuntimes/""/PIA/""/JVMRuntime/""/PIA")
totaljvm = cmo.getHeapSizeCurrent()
freejvm = cmo.getHeapFreeCurrent()
usedjvm = int(totaljvm) - int(freejvm)
cd("/ServerRuntimes/""/PIA/""/ApplicationRuntimes/""/PIA_peoplesoft/""/ComponentRuntimes/""/PIA_PIA_peoplesoft_PORTAL")sessioncounts = cmo.getOpenSessionsCurrentCount()
print '***************************************************'
print "......Now Checking Weblogic Web Server on" , ServerNameprint "Listening on" , ListenAddress print "Server Status :" , ServerState
print "Total JVM =" , int(totaljvm)
print "Free JVM =" , int(freejvm)
print "Used JVM =" , int(usedjvm)
print "Total Active Session(s) =" , int(sessioncounts)
print '****************************************************'
exit()
stopRedirect()
Below is output file (Monitoring.log)
Re-directing output to /apps/ps/webserv/peoplesoft/Monitoring.log
Connecting to weblogic server instance running at t3://mdsuaorq:7001 as username system ...
Successfully connected to Admin Server 'PIA' that belongs to domain 'peoplesoft'.
***************************************
Server Status =RUNNING
Total JVM =259522560
Free JVM =133010624
Total Active Sessions =1
***************************************
Exiting WLS scripting shell
Thursday, February 28, 2008
Weblogic Monitoring Scripts
Thursday, January 17, 2008
Implementing SSL on Weblogic Web Servers
Secure Socket Layer (SSL) and web server certificates are two of the most important components for a secured web communication. While those two components are pivotal to a secured PeopleSoft implementation, the knowledge and complete understanding remains nebulous to many PeopleSoft Administrator. On today's entry, I'll try to shed some light on the basic concepts of SSL and certificates on Weblogic web servers.
What is SSL ?
Secure Sockets Layer (SSL), are cryptographic protocols that provide secure communications on the Internet for such things as web browsing, e-mail, Internet faxing, instant messaging and other data transfers (Wikipedia).
SSL was created by Netscape to ensure transaction between web servers and browsers. The protocol uses a third-party usually called a Certificate Authority (CA), to identify one end or both end of the transaction. Below summarizes the follow of communication between the browser and the web server.
1. A browser requests a secure page usually sent with the following URL - https://
2. The web server sends its public key with its certificate.
3. The browser checks that the certificate was issued by a trusted party (usually a trusted root CA), that the certificate is still valid and that the certificate is related to the site contacted.
4. The browser then uses the public key, to encrypt a random symmetric encryption key and sends it to the server with the encrypted URL required as well as other encrypted http data.
5. The web server decrypts the encryption key using its private key and uses the key to decrypt the URL and http data.
6. The web server sends back the requested html document and http data encrypted with the key.
7. The browser decrypts the http data and html document using the key and displays the information.
Basic SSL Terminologies
Private Key/Public Key - These are encryption key pairs that ensures that data encrypted by one key can be decrypted by other key. The key pairs resides on both the browser and the web server.
Certificates - A certificate contains all the elements used to send an encrypted message to the owner (using the public key) or to verify a message signed by the author of this certificate. These elements include:
• reference to the issuer
• information about the owner
• certificate usage
• duration of validity
• resource location or Distinguished Name (DN) which includes the Common Name (CN) (web site address or e-mail address depending of the usage)
• the certificate ID of the person who certifies (signs) this information
• public key
• a hash (signature) to ensure that the certificate has not been tampered with
There are two types of certificates; Root Certificate which is usually signed by your Certificate Authority (CA) and the Intermediate Certificate. Depending on your Certificate Authority (CA), the Intermediate Certificate might not be provided. The Intermediate Certificate provides an additional layer of security to secured communication. Usually your browser and your web server already has Root Certificates of well known Certificate Authorities (CA) preloaded on your application. The CA maintains a list of signed certificates as well as revoked certificates. A certificate is insecured until it is signed by a CA.
Now that we've been exposed to the key concepts of SSL and Certificates, let's walk-thru updating an expired SSL Certificate in Weblogic Web Servers. Updating a certificate in Weblogic is almost the same as requesting a new certificate except for the latter (Update), which doesn't require you to delete expired certs. The following steps describes how to update an expired certificate in Weblogic.
I. Delete expired certificate from your keystore
Use the following command to delete expired certificate from your keystore:
Pskeymanager.sh –delete –v –alias test
(where test is the alias for the cert you want deleted)
http://i3.tinypic.com/869rckz.jpg
II. Generate a CSR on the web server and use it to generate a corresponding public key on the Certificate Authority’s web site.
To decrypt SSL request, it requires that you have a corresponding private key on your web server. You generate a private key and send it to the certificate authority (Verisign) to generate a corresponding public key /Trusted Certificate based on your private key information. To generate a private key, enter the following command on the web server command line and follow the prompt: pskeymanager.sh –create –alias myprivatekey
http://i8.tinypic.com/6tm60qu.jpg
http://i11.tinypic.com/6toj0pw.jpg
http://i15.tinypic.com/6ybu45x.jpg
III. Import the intermediate (Root CA) into your keystore via pskeymanager utitlity.
Go to the following link to obtain intermediate/Root CA from Verisign - http://www.verisign.com/support/verisign-intermediate-ca/secure-site-pro-intermediate/index.html . In this case, we are using Verisign as our CA.
Download the Intermediate certificate (Verisign requires that we obtain the Intermediate Certificate as well). When prompted, save as Intermediate.cer and FTP it in ASCII mode to your Weblogic domain directory. Execute the following command at the prompt to import the Intermediate certificate into your keystore :
Pskeymanager.sh –import -trustcacerts
http://i13.tinypic.com/86e4g1h.jpg
When prompted for an alias, specify VerisignTestCA as the name to store this CA as. This is simply an alias for this certificate. You can use any alias you want. When prompted for the certificate file to import, specify the Intermediate.cer file.
IV. Import the public key (certificate) you get from the certificate authority (Verisign) into your keystore via pskeymanager utility
When you receive your certificate via email from the certificate authority (Verisign), you will see your actual certificate in the following format :
-----BEGIN CERTIFICATE-----
MIIEvzCCBCigAwIBAgIQUhoVSb+AwOsuKn38CdU19TANBgkqhkiG9w0BAQUFADCB
dmVyIENBIC0gQ2xhc3MgMzFJMEcGA1UECxNAd3d3LnZlcmlzaWduLmNvbS9DUFMg
SW5jb3JwLmJ5IFJlZi4gTElBQklMSVRZIExURC4oYyk5NyBWZXJpU2lnbjAeFw0w
0dHA6Ly9TVlJJbnRsLWFpYS52ZXJpc2lnbi5jb20vU1ZSSW50bC1haWEuY2Vy
MG4GCCsGAQUFBwEMBGIwYKFeoFwwWjBYMFYWCWltYWdlL2dpZjAhMB8wBwYFKw4D
AhoEFEtruSiWBgy70FI4mymsSweLIQUYMCYWJGh0dHA6Ly9sb2dvLnZlcmlzaWdu
LmNvbS92c2xvZ28xLmdpZjANBgkqhkiG9w0BAQUFAAOBgQDFnyR7Xlsgbag97HqJ
mY+uIVhZunbymctkZ70789jEJzBKLTl+BRjpdYodu3DiOLLmusus2BJwTbMLBenk
dNKF11VHYTrrenNJCSkc6fzXJlG/jMUtSpbhUAmZxIcmRUst4UGaKF/PrAseT1ad
tA0KvM1DwTn/z+g6Ofw1QuDbJA==
-----END CERTIFICATE-----
A. Copy the certificate information, including - -BEGIN CERTIFICATE- - and - - END CERTIFICATE - - and save it as text file called
B. Import your certificate into your keystore:
To import your public certificate, execute the following at the prompt “pskeymanager.sh – import -trustcacerts”
http://i13.tinypic.com/86e4g1h.jpg
When prompted for password, enter ‘password’. When prompted for an alias specify the same alias you entered when you generated the CSR. It is very important that you match the alias otherwise the import would fail.
When prompted for the certificate file to import, specify your certificate file in step 1
C. Bounce the web server.
D. Verify that the certificate is in the keystore by entering this command at the prompt ‘pskeymanager.sh – list – alias myprivatekey’
To preview and verify the expiration date of your certificate, use the ‘ previewfilecert –file
V. Reconfigure Keystore/SSL on the Weblogic console.
Log into the weblogic administration console (http://machinename:port/console) and navigate the following path – Servers > PIA > Keystores & SSL
http://i7.tinypic.com/6tn8ewk.jpg
· Scroll down to the SSL Configuration section and verify the ‘Private Key Alias’ is the same as the name you specified when you created the CSR in step II, otherwise change it to match the alias. The ‘Passphrase’ field should be the same as keystore password when SSL was initially created (default password is ‘password’). Reenter the password to be sure you’re reconfiguring with the same password in the keystore. If password doesn’t match the password in the keystore, you will get ‘Cannot read private key’ error message and SSL port will not be listening when you reboot the server.
http://i9.tinypic.com/85kz7no.jpg
· Click on the ‘Change’ hyperlink to specify where to find the private key you created in step II. Remember that you need private key, public key and Intermediate certificate (a.k.a Trusted CA, Root CA, Chain Certificate) obtained from the certificate authority (Verisign) to complete a handshake SSL request. You can either manage these keys (private and intermediate) on file or let the keystore automatically manage them. When you manage these keys on file, identity and trust locations field on the SSL section of the web console should be changed to ‘Files or Key Stores Providers’. This type of key management would put explicit names and locations for the keys in the config.xml file. Make sure the files exist at the location specified in the config.xml file. These are the entries on the SSL section of config.xml file : Server CertificateFileName (public key), ServerKeyFileName (private key), TrustedCAFileName (intermediate). Click continue, log off the web console and bounce the web server.
http://i5.tinypic.com/81zmu7t.jpg
When you manage these key files automatically, identity and trust location field on the SSL section of the web console should be changed to ‘Key Stores’. This type of key management instructs weblogic to find private and intermediate key files on the keystore. You don’t have to explicitly define the locations for these key files. Click continue, log off the web console and bounce the web server.
http://i7.tinypic.com/86rcaom.jpg
Log on to the secured site to verify SSL has been updated. Double click on the padlock icon at the bottom of the browser and verify “Issued to” and “Issued by” on the General tab. Also verify the certificate chain by clicking on the Certification Path tab. The chain should be in this pattern – Verisign Class 3 Public Primary CA (Root CA) è www.verisign.com/CPS Incorp. by Ref. LIABILITY LTD.(c)verisign (Intermediate CA) è 
http://i6.tinypic.com/80mickg.jpg
Monday, January 7, 2008
PeopleSoft Enterprise Portal 9.0
Implementing PeopleSoft Enterprise Portal Solution requires a thorough understanding of the portal concepts, architecture as well as pertinent terminology that relates to PeopleSoft Enterprise Portal.
Portal provides an aggregated content from all systems in the enterprise. The rationale behind portal is to provide a one-stop shop for an enterprise where all relevant functions and content are available on the portal page. Most Enterprise Portal would provides the following feature – Multi-tab HomePage, Search, Content Management, Security, Notification, Personalization, Syndicated News, Web Services, Single Sign-On, Web Access, Web Services and Links.
PeopleSoft Enterprise Portal is a full functional portal platform that provides personal homepage, allows search capabilities, allows content management, provides enterprise navigation and provides template control. PeopleSoft offers the following portal products;
- Customer
- Supplier
- Employee
- Partner
The Enterprise Portal consist of portal features, pagelets and applications. The picture below shows a typical PeopleSoft Enterprise Portal page.

http://i11.tinypic.com/712z4tt.jpg
Understanding PeopleSoft Enterprise Portal Host Database Versus Content Provider Databases
To implement PeopleSoft Enterprise Portal, you need to configure a portal host database. The Enteprise Portal (PA) database is the host database. PeopleSoft application databases that contains the transaction content are called Content Provider databases. An example of your Content Provider database would be your DEMO848 database. Not to be confused with Enterprise Portal (PA) database which host your Enterprise application.
Configuring Enterprise Portal 9.0
- Set-up a separate PS_HOME on the file server (Unix or Windows). Enterprise Portal 9.0 requires PeopleTools to be on 8.48 and higher. The installed PeopleTools used by Enterprise Portal (PA) database and the installed PeopleTools product used by any additional application database cannot be the same. You must have a separate PS_HOME directory for your Enterprise Portal (PA) database.
- Create the Enterprise Portal (PA) database on the O/S of your choice. It is advisable to create a full demo database.
- Set-up Enterprise Portal (PA) database Application Server.
- Set-up Enterprise Portal (PA) database Process Scheduler.
- Set-up Enterprise Portal (PA) database web server. Make sure you configure Authentication token domain when you create the PIA site for Enterprise Portal (PA) database. This is required for Single Sign-On to the Content Provider database. If you successfully configure Enterprise Portal your screen should look similar to this.

http://i14.tinypic.com/8e8yxy9.jpg - Set up the default Portal Registry definition. The Enterprise Portal (PA) database can contain only a single default portal. The Enterprise Portal database is delivered with the default portal of EMPLOYEE. Change this to the portal of your choice. To do this, navigate the following path on the Enterprise Portal (PA) PIA site. PeopleTools > Portal > Portal Definition. A list of available portal name is displayed. Select the portal of your choice and save
- Configure Single Sign-On. This is a very critical step as SSO is required to seamlessly sign-on to different PeopleSoft applications. The following shows how to configure SSO in PeopleSoft Enterprise Portal :
I. Add Content Provider URI path to the portal database

http://i8.tinypic.com/89k0plf.jpg
II. Rename and Configure Password Authentication for the Default Local Node in the PeopleSoft Enterprise Portal

III. Configure Authentication Password in the Enterprise Portal (PA) database

IV. Configure the Enterprise Portal Default Local Node in the Content Provider Database

V. Trust the Enterprise Portal Default Local Node in the Content Provider Database

VI. Configure Authentication password in the Content Provider database (This is for the PA default node)

http://i9.tinypic.com/86trd50.jpg
VII. Configure Enterprise Portal URI Text in the Content Provider

8. Bounce the Enterprise Portal (PA) application server and web server
9. Login to your Enterprise Portal (PA) application and test SSO. To test SSO, click the PeopleSoft link on the left and select the content provider database you configured in Step IV

http://i5.tinypic.com/8er9gu9.jpg
Caveats
You might get the following error when you click on your content provider link on your portal page:

http://i17.tinypic.com/73otojo.jpg
If that is the case, you need to point to your LOCAL_NODE in the Portal Content Reference page. Navigate the following path to point the Portal Content Reference to your LOCAL NODE: Portal > Structure and Content > Portal Administration > Test > Single Sign-On . On the Content Reference section, click the edit link for the content provider database of your choice. Make sure Node Name field is pointing to the LOCAL_NODE of your Enterprise Portal (PA) database :

http://i14.tinypic.com/82tpno7.jpg
Navigate the following path to point the Portal Content Reference to your LOCAL NODE – Portal > Structure and Content > PeopleSoft . Click the edit link for the content provider database of your choice. Make sure you are substituting the LOCAL NODE name on the portal URL field with your LOCAL NODE name :

http://i12.tinypic.com/6ktqk2d.jpg
10. Bounce the Enterprise Portal (PA) application server and clear cache.
11. Log back into the application (PA) and click on the PeopleSoft link on the left. Click on the Content Provider database you configured earlier and you should be able to seamlessly login to the Content Provider database without prompting for password.
Sometime in the future, I'll delve into configuring portal pagelets and customizing your portal page.
Happy New Year!
Wishing you all a very happy and fulfilled 2008. As you've all noticed, I took a long hiatus from blogging last year to attend to some personal needs. This year I'm back and I'll be sharing tips and personal notes from my archives. I will endeavor to keep this page active as much as I can.
Again, Happy New Year!.
Wednesday, April 4, 2007
Load Balancing Hardware Evaluation
I was recently tasked with evaluating Content Sensitive Switching/Load Balancing solution for a client’s PeopleSoft infrastructure. The client is upgrading its current Peopletools 8.3 to 8.9 (HCM). As part of the upgrade, there has been expressed desire by management to build a fault-tolerant architecture. The growing need to increase availability requires building redundancy across every tier of the architecture. Deploying a solution that meets that goal requires a good understanding of Load balancing architecture and algorithms, and most importantly PeopleSoft Weblogic hardware requirements for load balancing. The dynamics of Load balancing a.k.a Content Sensitive Switching a.k.a Application Switching is to present a Virtual IP (VIP) address to end-users that send incoming requests to one or more back-end web servers. Traffics are then re-routed by a pre-defined algorithm (round robin) to these back-end web servers.
In addition to routing traffic, load balancing tools are typically required to perform several functions related to the routing decision -
- Monitor server loads and distribute incoming requests to balance the load across servers
- Examine the client requests to determine which server is appropriate to handle the request
- Identify the client to maintain session affinity with a particular server for e-business applications
- Maintain session persistence to enable failover to a hot standby to improve availabilityDetection and avoidance of many common denial-of-service attacks
- SSL acceleration to improve the performance of secure applications
- Simplified configuration and management
- Health Monitoring
Weblogic Load Balancer Requirements
Weblogic requires that load balancing hardware support compatible active or passive cookie persistence and SSL persistence mechanism.
I. Passive Cookie Persistence
Passive cookie persistence enables Weblogic Server to write a cookie containing a session parameter information through the load balancer to the client.
II. Active Cookie Persistence
Active cookie persistence enable Weblogic server to write a cookie containing a session parameter information through the load balancer to the client provided the load balancer does not modify Weblogic Server cookie. Load balancers that alter active cookie sessions are not supported by Weblogic.
III. SSL Persistence
When SSL is used, the load balancer performs all encryption and decryption of data between clients and the Weblogic server cluster. The load balancer then uses the plain text cookie that Weblogic Server inserts on the client to maintain an association between the client and a particular server in the cluster.
Stateless Vs Stateful Failover
Another thing that played a huge role in our decision making was the Stateful Vs Stateless failover issues. How much data loss are we able to handle if a server fails ?. Which vendor hardware provide these kind of failover solution. Invariably in our case, transaction loss was not an option.
I. Stateless Failover
Under stateless failover, if a server fails user session shall be restarted with another functioning server. All unsaved data on the failed server shall be lost but the user login will be preserved.
II. Stateful Failover
With stateful failover, user session are maintained on another machine in cluster. Weblogic Server creates a primary session state on the server to which the client first connects, and a secondary replica on another Weblogic Server instance in the cluster. The replica is kept up-to-date so that it may be used if the server that hosts the servlet fails. Stateful failover enables session resiliency during critical failure.
With these in mind, I set out to review a number of load balancing hardware offerings in the market that best fit our requirements. The following vendor offerings were reviewed – Zeus Traffic Manager (ZXTM), NetScaler, Foundry ServerIron and BigIP (f5). While most the aforementioned products offers the basic load balancing requirements – Content Sensitive Switching, Advanced Traffic Routing, Session persistence and so on. BigIP (f5) stood from the pack – Read Ben Rockwood’s blog entry on NetScaler Vs f5. Having the largest market share in the load balancing hardware market, BigIP (f5) was a familiar ground for me. I’ve worked with it in the past and it worked well. My preference for BigIP (f5) were in the following space –
Scalability - BigIP provides the most scalable hardware solution in the market. If one service is nearing capacity, scaling it is as simple as adding another instance of the service to your network and then to the BigIP load balancing pool without disruption of service. This seamless scalability feature gives it an edge over its competitor.
SSL Acceleration and Consolidation – With BigIP, you can handle SSL decryption on the load balancing hardware thereby eliminating those CPU-intensive activities at the server level. Another thing I like about BigIP is the ability to consolidate SSL certificates thereby saving money per certificate. Instead of having SSL certificates on a per server basis, you can now having 1 certificate on your load balancing hardware that handles all secured service requests
In conclusion, we went with BigIP because of its ability to scale easily and it's simplified configuration/management.
Wednesday, March 7, 2007
Tuxedo Administrative Console (Web GUI)
Without much ado, I'll kick this blog off with configuring and administering the Tuxedo Administrative Console a.k.a Tuxedo Web GUI. A lot of PeopleSoft Administrators aren't aware of the full capability of the Tuxedo Web GUI, hence they don't take advantage of its functionalities. What I like most about this utility is the ability to make dynamic changes to PSTUXCFG file, which doesn't exist in PSAPPSRV.CFG file. In addition, logs are more intuitive and laid out better than on the host server. I use it mostly when we are running a Performance load test or during peak performance period.
The Tuxedo Administrative Console has evolved over the years. Since its inception in Tuxedo 5.1, a lot has been added to enhance the functionality and looks. Back then, the GUI can only run on Windows. From versions 6.1 - 8.1, the GUI can be configured on both Unix and Windows platforms. I recently configured the GUI for one of my client running Tuxedo 8.1 SP3 and here is primer for those of you interested.
Tuxedo Web GUI consists of the following:
- A simple web server, HTML files and Java applets
- A Listener process for Applets to connect back to
- Configuration Files
The Web server is a Tuxedo Supplied web server called “tuxwsvr”. It is not a commercial grade web server as it can only handle up to twenty (20) simultaneous connections. The web server configuration file is located on the $TUXDIR/udataobj/tuxwsvr.ini. The primary purpose of the web server is to obtain information from the Tuxedo BBL.
The Listener is also a Tuxedo process that listens for the web server request at a well-known port. The listener process is called “wlisten” and it enables communication between the web server “tuxwsvr” and Tuxedo processes. The wlisten configuration file is also located on $TUXDIR/udataobj/webgui/webgui.ini.
Connect Procedure
1. Browser contact the web server at a well-known address via an http string
2. Web server contacts the wlisten process at a well-known address established via the configuration files
3. Wlisten contact/spawns handlers to deal with client
4. GUI begins to communicate via applets
Starting Tuxedo Admin Console
To start Tuxedo Web GUI, you need to start the web server (tuxwsvr) and the listener process (wlisten) via commandine. Here’s how you start the GUI : - psoft@hrm33: /opt/JDC/ps/hms820/devel $ wlisten –I /$TUXIDIR/udataobj/webgui/webgui.ini
- psoft@hrm33: /opt/JD/ps/hms820/devel $ tuxwsvr –l //: -I /$TUXDIR/udataobj/tuxwsvr.ini -L /$PS_HOME/appsvr/demo/LOGS (where l =network address of the web server; I = name/location of the initialization file; L= Name and location of logfile for web requests and error)
To verify the processes are running , grep for “wlisten” and/or “tuxwsvr” i.e ps –ef grep tuxwsvr. Once started, enter the following connection string on your browser to enter the GUI – http://[machine_name]:[tuxwsrv_port]/webguitop.html
Login/Password
There are 2 reserved login into the console :
- tpsysadm (Tuxedo Administrator)
- tpsysopr (Tuxedo Operator – limited to admin rights. Cannot Start/Shutdown domain) Default password for tpsysadm/tpsysopr is ‘password’. This can be changed on the tlisten.pw file located on $TUXDIR/udataobj/tlisten.pw
Adding Domains
From the Web GUI, Navigate the following path – Domain > Open. Add the domain name and PSTUXCFG path for that domain.

Quick Guide
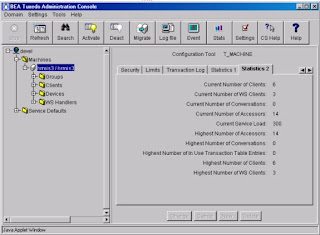
Current Number of Client : You can view the current number of clients connected to the domain from the machine level via the Machine drop down on the left. Select the Machine name and and tab over to “Statistics 2”.
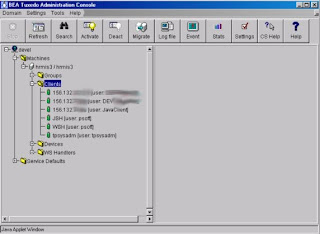
Current Number of Client (Client drop down): The Tree display on the left also provides you with information on current connected clients. At this level provides an additional layer of administration. Right-click on a client to view options.
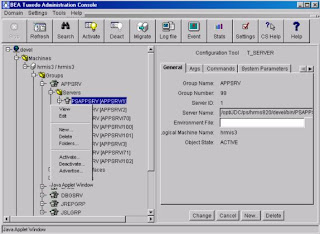
Adding/Removing Server Processes : From the Tree display on the left, expand GROUPS, expand APPSRV, expand SERVERS. Right-click on the server process you want to add/remove.
Changing JSL Parameters : From the Tree display on the left, expand JSLGRP, expand SERVERS and select JSL. Tab over to the ARGS tab and make changes to the MIN/MAX value of the JSL.
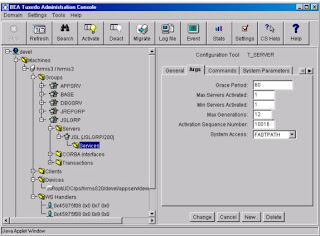 You can also make dynamic changes to JSL parameters like port number, min/max client per handler, init timeout, client cleanup timeout and so on via the Command tab.
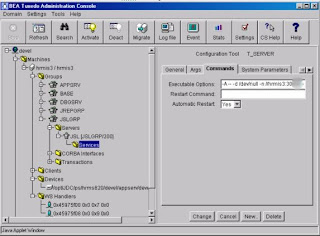 Modifying Server Process Parameters: From the Tree display on the left, drill down to server process and the service you want to change. This particular examples shows you how to change Service Time out for a PSQRYSRV process.
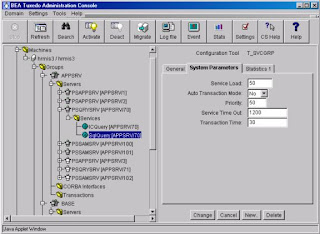
Boot/Shutdown a domain : From the tool bar, select ACTIVATE (This can boot all or a selected portion of a domain.). The activate menu will appear with series of tabs. Select the desired tab. Check the ‘only activate/deactivate administrative servers’ check box and click the activate/deactivate button depending on the server status at the time this action is performed.
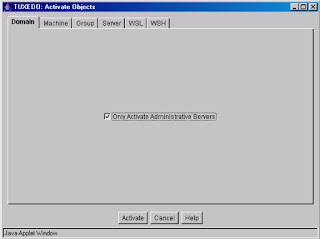
The activate/deactivate function only start processes that don't need a database connection. To activate/deactivate individual server processes, you need to add these 2 variables to the psappsrv.ubx file - PS_SERVDIR={ $PS_SERVDIR}
PS_SERVER_CFG= {$PS_SERVDIR} {FS}{CFGFILE}
